Composite Deck Repair

If splintering, cracking and warping are common issues on your deck, it may be time for a rebuild. A new deck made from composite materials is more durable and will save you money in the long run.

Deck Repair

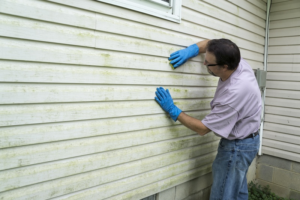
Rotting wood is a serious safety issue. If you spot rotting boards, sister them as soon as possible. Contact Deck Repair Nashville for professional help.

A well-loved deck is a serene oasis for relaxation until the elements take their toll and damage the wood. Fortunately, this damage is easily repairable as long as the problem isn’t too severe. If signs of deterioration like splintering, cracking and warping have become widespread, however, a full replacement may be necessary to ensure safety and structural integrity.

A deck’s most common issues are related to rot, insect infestation and water damage, but other problems can also occur, such as loose or missing boards. These are typically easy to spot and are more likely to occur if the deck is old.

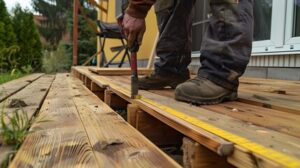
Loose or missing boards can be easily fixed with a few simple repairs. First, if the deck is still intact underneath the damaged board, remove it using a pry bar and replace it with a new one. Then, nail or screw the new deck board to the existing joist.

For more serious issues, you’ll need to reinforce the joists. If the joists are in good shape, then this may be possible through repair, but in most cases, you’ll need to replace them. A professional can evaluate the situation and make a recommendation based on your budget and desired outcome.

To reinforce a damaged joist, you’ll need to add cleats or sister joists. These are treated boards that are nailed or screwed to the existing joist at either end of the deck board you’re replacing. They’re designed to support the new deck board and help prevent rot in the surrounding joists.

Before you install a new deck board, make sure it’s the correct size by measuring the old one and the joists. Use a tape measure to get precise measurements and mark the cutting line. If the new board will span more than one joist space, then be sure to cut it flush with the joist’s centerline. After you’ve installed your replacement deck board, sand it smooth to eliminate any rough surfaces and make it blend in with the surrounding boards. Then, apply a wood preservative to the cut edges to protect against moisture infiltration and prolong its lifespan.

Repairing Cracks

When deck boards begin to crack, they should be repaired before the cracks widen and cause structural damage. This can be done by using specialized filler that is designed to work with composite materials, ensuring that the filled crack blends seamlessly with the rest of the deck’s surface. Before applying the filler, it is important to thoroughly clean the area around the crack. This will ensure that the filler adheres properly to the deck board and helps reduce the risk of further damage or contamination from debris. It is also a good idea to use masking tape to outline the area of the crack, which will help prevent the filler from spreading onto unaffected areas of the deck.

Moisture is one of the most common causes of composite deck cracking. Moisture can cause the wood to swell and warp, which in turn can lead to the creation of large gaps. Proper drainage and regular cleaning to remove debris can help manage moisture levels and keep the deck in a healthy condition.

Typically, large cracks in composite decking are not caused by structural issues, but rather by expansion and contraction of the composite material. However, if these large cracks are not repaired in a timely manner, they can become unsightly and compromise the overall aesthetic of your pool deck.

To repair these larger cracks, first, you will need to thoroughly clean the cracked area and use a coarse-grit sandpaper to smooth the rough edges of the crack. Next, you will need to apply the filler and press firmly into the crack to avoid air bubbles. After the filler has dried, you will need to sand it again with fine-grit sandpaper until it is smooth and level with the surrounding area.

While this may be a difficult task, it is essential to address the issue before it becomes worse and potentially compromises the structure of your deck. It is recommended that you hire a professional to perform this repair, as it will be safer and more efficient than trying to do it yourself. Once the repair is complete, you will need to seal the cracks with a deck oil to prevent further water penetration and soil migration underneath the deck.

Painting or Staining Your Deck

The choice of whether to paint or stain your deck can come down to personal preference and the kind of look you want. Both are great options for protecting your deck and making it last. Stain is a bit more durable than paint because it forms a thicker protective film on the surface of your wood. However, paint offers a much wider color selection and is easier to clean.

Before you apply any stain or paint to your deck, it’s important that you properly prep the surface. This includes sanding it down, if necessary. This will make it smooth and ensure that the stain or paint will adhere properly and last longer. It’s also a good time to look for any cracks or chips that need to be repaired and to treat any areas of wood rot or mildew.

You’ll also want to check the flashing that protects the area where your deck meets your house. If it’s loose or rusting, you should replace it. Finally, it’s a good idea to inspect and secure any nails or screws that are loose or missing.

Once you’ve done this, you’re ready to start the actual painting or staining process. Regardless of the choice you make, it’s always best to work on a dry day, and if rain is in the forecast, it’s best to reschedule your project for another day.

When working with an old deck, the painting process can take a little more time than if you’re starting with a newer one. The reason for this is that there will likely be more imperfections in the older wood, and you may need to use a filler or wood putty to repair them before you can finish painting.

In addition, if your deck is old and already painted, you’ll have to remove the old paint before you can apply the new stain or paint. This can be a very time consuming task, but it’s important to do it if you want your new coat of stain or paint to last. After you’ve removed the old coating, you can clean and sand the deck again.

Hiring a Professional

Professionals understand the best repair techniques and equipment. This allows them to tackle the project quickly and effectively. Their expertise and experience also allow them to spot potential issues that may not be immediately apparent. This can save homeowners time and money in the long run. For example, they can recommend the use of moisture-resistant materials or an appropriate stain that protects the wood from rotting.

Moreover, skilled contractors can source high-quality materials at competitive prices, reducing the overall cost of the repairs. This is an important advantage over DIY repairs, as they typically incur higher material expenses due to purchasing in smaller quantities and lacking access to wholesale prices. The use of quality materials also contributes to the durability and longevity of the repairs, further lowering costs over time.

A deck repair project requires a substantial amount of time and resources to complete properly. Therefore, hiring a professional helps homeowners minimize disruption to their regular outdoor use. For instance, they can schedule the work to avoid interfering with outdoor events and other activities. They can also provide a warranty on their work, giving homeowners peace of mind in the event that any repairs are necessary.

Decks are a wonderful addition to homes and a great way to enjoy the outdoors. However, it’s crucial to monitor your deck for signs of wear and tear so that you can schedule repairs promptly. If you notice deteriorating railings, loose boards, or cracks, it’s vital to contact a professional handyman for repairs to ensure your deck is safe and functional.

A well-maintained deck adds value to your home and creates a welcoming outdoor space for family and friends to gather. It’s essential to recognize the warning signs and hire a professional when needed to ensure your deck remains in good condition for years to come. If you have any questions or need assistance with your deck, please don’t hesitate to reach out to our team of experts.

How to Lower the Cost of Siding Repair

Charleston Siding Repair is a significant investment, but there are ways to lower the cost. The first is to determine if the damage is easily repairable. For small cracks and holes, simply measure the broken section of siding and cut a replacement board to size.

Homeowners should address any issues as soon as they notice them to avoid costly damage down the road. Leaving small problems unattended can snowball into bigger issues, like rotting or mold.

Aside from reducing curb appeal, cracks and holes in vinyl siding allow water to penetrate the wall, causing extensive damage over time. If left untreated, water can cause the wall to rot, mold to develop, and weaken the foundation of your home. Fortunately, these issues can be prevented with a few simple steps.

Before beginning your repair, locate the crack or hole and determine how big it is. This will help you decide which method to use for the repair. For small divots and holes less than an inch in diameter, you can simply apply caulk to the area. This will seal the blemish and prevent water from infiltrating your walls.

Larger holes may require a patch, which can be found at many home improvement and hardware stores. To prepare the patch, cut away a 2 in (5.1 cm) perimeter around the damage. This will help you make straight and even guidelines that will ensure your new replacement piece fits correctly.

Once the patch has been prepared, it is important to clean the surrounding area to ensure optimal adhesion of the caulk. This will also ensure that the crack or hole is free of any dirt or debris that could negatively impact the appearance of your home’s exterior.

When repairing a crack or hole in vinyl siding, you will want to use an exterior caulk that is color-matched to your existing wall to ensure that the repair is undetectable. When applying the caulk, be sure to use a wide enough bead to effectively cover the damaged area. Once the caulk has been applied, wait for it to dry before attempting to touch up any paint that may be affected.

While this repair can be completed by a competent DIYer, if you are not comfortable working with tools like tin snips or utility knives, it is a good idea to call in a professional to ensure the job is done correctly and safely. Additionally, if you are noticing extensive damage to your vinyl siding, it is often more cost-effective and efficient to hire a professional.

Warping

If you have noticed that your home’s siding has begun to droop, buckle, or twist, you may be dealing with what is known as warped siding. Not only does this problem look unsightly, but it can also cause serious moisture problems and damage to your home’s inner walls. This problem can be caused by a number of different factors, including excessive heat, improper installation, and dark paint colors.

Excessive heat exposure is the most common reason for vinyl siding to warp. This usually happens during the summer when sunlight is directing a lot of thermal energy toward your house’s exterior. Since vinyl is a type of plastic, it will begin to melt as the thermal energy causes it to expand. This is especially problematic for older vinyl siding, as well as dark-colored vinyl.

Other reasons for warped siding include the use of poor quality vinyl or an unreliable brand, and poor installation. If your vinyl is nailed down too tightly, it will not have enough room to expand during hot weather and will warp or buckle as a result. This is especially a concern if your vinyl was installed without the proper ventilation, as the lack of airflow can lead to moisture problems.

It is important to check your siding regularly for signs of warping and other damage, including cracks and holes. You can do this by conducting a visual inspection and by running your hands over the surface to feel for weak spots. It is also a good idea to conduct regular inspections after severe weather, as strong winds or hail can lead to cracks in your siding.

Moisture infiltration is another common problem that can contribute to warping and other types of damage to your home’s exterior. Water seeping through gaps, cracks, or poorly sealed joints can damage the inner walls and lead to mold growth. You can prevent moisture from infiltrating your home by caulking joints, replacing damaged siding, and ensuring that there are adequate vents in your roof’s soffit or behind your siding.

Peeling Paint

Paint can crack and peel when the surface beneath it is damaged or if moisture seeps through gaps in the siding. If the problem is limited to a small area, you can usually repair it by applying a caulking solution made for exterior use.

If you have more extensive areas of peeling paint or if the siding itself is damaged, it may be best to hire a professional. A qualified painter can remove all of the old paint, thoroughly clean and prep the surface for painting, repair any damage, and apply a fresh coat of high-quality exterior grade paint that resists moisture.

A thorough cleaning and prep process is essential to prevent future problems with your vinyl siding. The cleaner your surface is, the better it will adhere to primer and paint. It is also important to remove any moss, mildew or dirt from the surface. A good power wash followed by a thorough rinse will ensure that your surface is free of debris and contaminants.

Moisture can cause wood to expand and shrink. This can lead to blistering, peeling, and flaking. A thorough inspection can help you determine the source of moisture and address it to avoid future problems with your siding.

In many cases, a peeling paint job is caused by poor surface preparation or moisture seeping in through gaps in the vinyl siding. Jane had peeling paint on her home that was a clear indication of the need for a siding replacement. She contacted our team and they identified the root cause of the issue. The team removed the peeling paint, cleaned and prepped the surface for painting, repaired any cracks or holes in the siding, sanded the surface smooth, and applied a new coat of high-quality exterior grade paint that was moisture resistant.

The results were stunning. The new paint job added significant curb appeal and provided a much-needed layer of protection against the elements. Jane also established a routine of regular cleaning and maintenance that will help her to prevent future issues with her vinyl siding.

Water Damage

When wood siding gets wet, it often starts to rot. This can leave holes, create loose areas, or lead to more serious structural problems within your home. It’s essential to catch this problem early by keeping a close eye on your siding and recognizing the warning signs. Regular inspections, especially after storms and during humid seasons, can help prevent water damage from causing costly issues down the road.

In addition to obvious holes and cracks, you can also notice the presence of fungus or algae, discoloration, or streaks on your home’s exterior. These organisms thrive in moist environments and are a clear indication that your siding needs repair or replacement.

Another surefire warning sign is a musty smell near walls, which can indicate a hidden mold issue. You may also notice a higher than normal number of pests, as they are attracted to rotting and damp wood.

Depending on the severity of the damage, you may need to remove the affected boards before proceeding with your repair. Start by carefully lifting the nails with a pry bar, taking care not to damage the underlying structure. Once the boards are removed, you can replace the damaged sheathing and install a waterproof barrier such as house wrap to protect against future moisture infiltration.

For divots and holes less than an inch in size, you can usually repair them with caulking material that matches your existing siding. Simply load a caulking gun with your preferred filler and apply it to the divot or hole, slightly overfilling it to account for shrinkage as it dries. Once the caulking is dry, sand it smooth with medium-grit sandpaper and then prime and paint as directed by the product’s instructions.

For larger holes, sagging areas, or missing portions of your siding, it’s time to call in a professional contractor. A trusted and experienced provider can evaluate your siding’s condition, determine the source of the problem, and provide a full range of repairs to ensure that your home’s protective exterior is in good working order for years to come. Whether you have vinyl, wood, or masonry siding, prevention is key to avoiding costly water damage. Regular inspections and proactive measures like cleaning gutters, directing downspouts away from your foundation, and maintaining a high-quality protective coating can significantly reduce the risk of moisture infiltration and structural damage.

Navigation