As with any construction job, roofing work produces a lot of noise. If you or your family are sensitive to loud noise, it’s a good idea to keep them away from home while this work is taking place.
The first thing your roofer will do is lay an ice and water barrier (if there isn’t one already) and underlayment. This protects the sheathing from moisture and adds strength. Learn more by visiting https://www.corpuschristiroofingco.com/.
The roof over your head is more than just a shield from the elements. It’s a critical design feature and an investment in the longevity of your home. As such, it’s important to weigh the benefits and drawbacks of different roofing materials before making a decision. Durability, cost, energy efficiency and aesthetics are all important factors to consider.
Asphalt shingles are the most common residential roofing material, favored for their cost-effectiveness and considerable variety of color and style options. They’re composed of a fiberglass or organic base that’s covered with mineral granules and asphalt, and they offer a moderate level of durability that can last up to 30 years.
For flat roofs, single-membrane systems are popular, including EPDM rubber roofing, PVC roofing, and chlorinated polyethylene and chlorosulfonated polyethylene sheets. These systems provide a watertight seal over any existing substrate or structure, such as wood or concrete decking.
Specialty shingles designed for the hip and ridge areas of your roof give it a finished look and provide protection from moisture build-up. Fascia boards, which get hung from the ends of rafters or trusses, are also essential components for your roof frame. They help to protect the roof from water damage and direct rainwater into gutters, which help prevent flooding or other structural problems in your home.
Other important roofing materials include underlayment, ice and water shield, and flashing, which reinforce vulnerable areas and enhance waterproofing. Underlayment helps to keep your home dry during the roof tear-off process and serves as a base layer for the other layers of your roofing system.
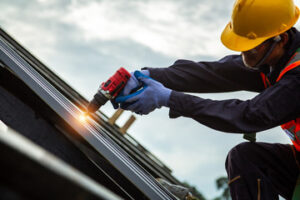
A roofing nail gun and high-quality nails are also required tools for securing shingle or other materials. Other specialized roofing tools include a roof ripper, which can be used to remove old roofing materials during a complete roof replacement. Before starting a project, it’s crucial to clean the roof thoroughly with a broom and blower. It’s also essential to wear work gloves and long pants during the cleaning and installation process. Lastly, be sure to stay safe by using a ladder instead of walking on the roof.
Preparation
Once you’ve selected your roofing materials, it’s time to get ready for the project. The first thing that your contractor will do is remove your old roof. This process can be noisy and messy, so it’s important to make arrangements for children and pets to stay elsewhere while the work is done. They can either be kept at a friend’s house or boarded in a pet-friendly facility. It’s also a good idea to have an activity planned for them to keep them busy and out of the way.
Next, the roofers will begin removing the underlayment and installing new materials. This step can be messy, so it’s important to cover sensitive areas of your home and yard with tarps. This will protect your landscaping and plants from shingles and other debris that may fall off the roof during the tear off process. It’s also a good idea for you to clear the area around your house and move vehicles, patio furniture, grills, potted plants, lawn ornaments, and any other items that might be damaged by falling debris or the pounding of hammers and nail guns.
The installation of your roof will likely take multiple days. You’ll want to make sure that you have a place to park your car and that it will be out of the way during this period. Your roofers will need to drive their vans, trucks, and other equipment to your house, so having a place for them to park will help the project run smoothly. It will also be easier for you to get in and out of your driveway.
The pounding of hammers and nails will cause vibrations throughout your home. This can damage wall-hung pictures and other fragile items. If you have knick-knacks or mementos on your walls, it’s a good idea to cover them or relocate them to lower parts of your home during the replacement process. The same goes for objects in the attic, which can be shook by the noise and movement. It’s also a good idea at this point to clean up and cover any drains in your yard, so they don’t become blocked by shingle debris.
Installation
Roofing is difficult work that requires a lot of time and can be very dangerous. For this reason it is recommended that homeowners who are not experienced in re-roofing should hire professional contractors to perform the work. The first step in the process is to clear the roof of any debris, and then to prepare the deck for the shingles. The contractor will cover sensitive areas of your yard and home with tarps and will bring in a dumpster to dispose of the old roofing materials. The contractor will then start laying the first row of shingles, overlapping the starter strip and nailing in place. The shingle rows will then be offset from each other by six inches, so that tabs in adjoining rows never line up.
Final Inspection
During the final inspection, the roofer will check that all of the components have been installed and are in good condition. The inspector will also walk the entire roof to validate the nailing pattern, look at areas that were noted as crucial during the pre-inspection and ensure that everything was done to minimum code.
Inspecting for safety and quality is an essential part of any construction project, but it’s especially important when a building is ready for occupancy. If the final inspection fails, a number of issues could arise that have to be corrected before the property is legally able to be used for its intended purposes. These can include anything from a minor issue like the wrong number of outlets in a room to something major such as the soil has moved, causing the foundation to crack.
When scheduling the final inspection, make sure that you allow enough time to correct any issues. Generally, a final inspection can take about three hours to complete. It’s a good idea to have a checklist that shows which items were completed and which ones need to be addressed. This can help prevent any confusion when it comes time to schedule the inspection and can ensure that the entire process runs smoothly.
A reputable roofing contractor should be intimately familiar with the local codes that pertain to the type of roof being installed. For example, NYC requires specific fire ratings for certain types of shingles and other materials. They should also be knowledgeable regarding egress requirements and other code compliance concerns.
A final building inspection is a crucial step in any construction project, and failure to pass can delay the closing of a home or commercial building significantly. It’s important to work closely with a professional during every step of the process to ensure that the building is up to code before a final inspection is scheduled.
Some inspections are required prior to the final inspection, including a pre-inspection, a post-mortgage inspection and a lowest floor elevation inspection for buildings in flood hazard zones. The general contractor is generally responsible for scheduling these inspections and making sure that the building is up to code at each stage before a final inspection is conducted. By doing this, the builder can ensure that no surprises come up at the final inspection and can help keep the project on schedule and on budget.