Tag: insulation removal

Ceiling Repairs – Common Problems That Require Specialized Solutions

Ceilings are an integral part of a home and may experience various types of damage. These issues often require specialized solutions to ensure their longevity.

Hairline cracks in ceilings are common and can result from structural settling, temperature changes, or poor workmanship. They should be addressed promptly to prevent their progression into a more serious issue. Contact Ceiling Repairs Perth now!

  1. Cracks

Cracks in ceilings can be caused by several issues, including the natural settling of a house and shifts in walls that put pressure on drywall. They can also be caused by moisture issues, like plumbing leaks or condensation build-up. Whatever the cause of the crack, it’s important to address it immediately. Otherwise, it could lead to further structural damage and more expensive repairs.

If the cracks are wide and extend from wall to wall, this is a sign that it’s time for professional help. A skilled and experienced foundation specialist can assess the cracks, identify the underlying issue, and recommend how to fix it.

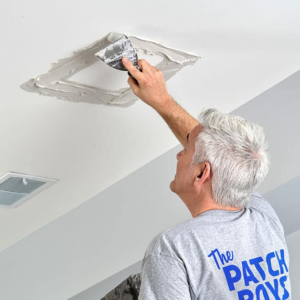
When repairing ceiling cracks, it’s best to start by scoring the crack with a utility knife and then covering it with mesh tape. This will help the mud bond directly with the plaster and make the repair stronger. Next, apply a coat of joint compound to the cracked area, being sure to cover the mesh tape and all screw heads. After applying the compound, sand it smooth and allow it to dry according to the product instructions.

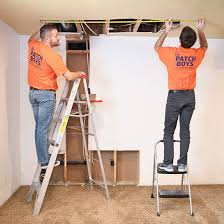
It’s also a good idea to lay down a tarp, sheet of plastic, or drop cloth before starting the project so you don’t end up with any mess on your floor. This is especially helpful if you are working on an upper level, as it’s likely you will need to use a ladder. It’s also a good idea to remove any furniture from the room so you can reach the cracks easily. Then, set up a ladder that can stand flat on the ground and is tall enough for you to work comfortably.

  1. Water Damage

Water damage is one of the most common problems homeowners face. From leaking roofs to damaged plumbing, water damage can affect the ceiling and other areas in the home. If not addressed in time, it can lead to mold growth and further structural problems. Identifying the cause of the problem and addressing it quickly can save homeowners money in the long run.

The first step is to dry out the affected area as much as possible. It’s best to place down drop cloths or tarps to protect the flooring and catch any dust or debris created when removing the damaged drywall. If there is a bulging area of the ceiling, it’s also a good idea to puncture it and have a bucket in place to catch any dripping water.

Once the ceiling is completely dry, it’s a good idea to replace any damaged sections of drywall. This can help prevent further water damage and may even save the homeowner some money in the long run versus repainting over existing ceilings with stains or other discolorations.

Before replacing drywall, make sure to turn off the power to the room you’re working in and wear rubber gloves to avoid touching any wet materials. Carefully remove the damaged section of the ceiling, making sure to cut away any insulation or drywall that is moist or covered in mildew. Once the new piece of drywall is in place, make sure to prime it and paint it. Make sure to open windows for proper ventilation during this process. If you notice any mold or mildew forming, you should call in a professional to treat the area before it spreads.

  1. Sagging

A sagging ceiling is more than just an eyesore. It can also be a safety hazard and a sign of impending collapse, so it’s important to address the issue as soon as possible. A building inspection will help identify the cause of the problem and determine the best course of action for repair.

One of the most common causes of sagging is water damage. If left untreated, it can cause drywall to rot or warp and lead to ceiling collapse. If this is the case, it’s essential to fix the leak before beginning any repairs on your sagging ceiling.

Other causes of sagging include poor construction and inadequate support for the ceiling. This can be caused by undersized frames or beams that cannot handle the weight of the ceiling, as well as wide beam spacing that reduces support. Insufficient insulation can also increase the weight of a ceiling, leading to sagging over time.

Sagging ceilings can be repaired in a variety of ways, depending on the cause. Firstly, it’s essential to check that the gap between the drywall and lath (the wooden structure) isn’t too wide. If it is, the sagging can be corrected by using a drill to create injection holes that are then filled with adhesive.

A professional contractor will be able to diagnose the problem and recommend an effective solution. They’ll have the experience and expertise to ensure that the repair is done properly and efficiently, restoring the structural integrity of your home. They’ll also be able to assist with the application for any necessary building permits and guarantees. This can save you a lot of time and hassle, as well as the cost of a potential insurance claim.

  1. Mold

A ceiling that is a hotbed for mold and mildew can be very hazardous to one’s health. If left unchecked, it can also result in reduced insulation and higher energy bills.

Mold growth can be caused by a number of factors, including high humidity levels, lack of ventilation, and organic material (like plants) being left in the home. It can also be the result of recent water damage from a leaky roof or burst pipe.

If the mold is limited to a small area of the ceiling, it may be possible to clean it using fungicide and scraping. If the mold has spread to the point where it is visible or smells musty, then the entire drywall should be removed and replaced with fresh drywall. This will prevent future mold growth and ensure that the integrity of the framing isn’t compromised.

It’s always best to have mold problems addressed professionally, as they often require a thorough inspection and repair to avoid structural issues within the home. A professional can help identify the source and cause of the problem, remove any affected materials, dry out the area, and then treat and sand the surface for patching.

A ceiling is more than just a decorative surface to a room; it protects the interior from the elements, provides insulation and soundproofing, and contributes to a home’s overall safety and comfort. Ceiling repairs should be conducted promptly to prevent structural damage, health risks, and other costly issues. A homeowner can address minor cracks and a few areas of discoloration, but significant water damage and mold or mildew growth should be dealt with by professionals to ensure that the ceiling is restored properly and safely.

  1. Unpleasant Smells

If you find your ceiling emitting unpleasant odors, it could be a sign of mold or mildew that needs to be addressed. If left untreated, these issues can affect your indoor air quality and lead to respiratory issues or allergic reactions.

If the odor is strong, it may indicate that there is a leaking pipe above the ceiling. In such cases, it is important to protect furniture and valuables from water damage before beginning repairs. Once the leak has been repaired and the affected area has dried, a drywall repair professional can help restore the ceiling to its original condition.

The ceiling is often a forgotten part of the interior of your home or business, but it plays a key role in both the aesthetics and the structural integrity of your space. Whether due to age, wear and tear, or an infrequent mishap, it is possible that your ceiling has suffered from cracks, sagging, or water damage. Fortunately, there are a variety of methods that can be used to revitalize your ceiling and create a fresh, captivating interior.

For minor cracks and water stains, patching and repainting are an inexpensive option that can drastically improve your ceiling’s appearance. For more severe cracks and stains, drywall repair or replacement may be necessary. If your ceiling is covered with popcorn or another outdated texture, removal and restoration are an effective solution to bring it into the modern era. For more serious issues, professional contractors can address underlying problems and prevent them from reoccurring. Enter your zip below to be matched with top-rated pros near you!

Ceiling Repair – How to Fix Common Ceiling Problems

Many homeowners need help with their ceilings. A few common problems include cracks, water stains, and holes.

Long, running cracks in the ceiling can indicate serious structural problems. These often involve pulling the drywall from the attic joists or trusses, which isn’t a project for the average homeowner. Contact Ceiling Repair Perth now!

Damp spots on the ceiling may develop mold or give off a musty smell. Drying the area quickly is critical to prevent further damage and reduce repair costs.

Cracks

A crack in your ceiling may seem unsettling, especially if you recently spent money and time decorating the space. However, the good news is that these minor cracks are unlikely to indicate any structural problems in your home.

Most cracks result from movement within your house’s structure. The floor joists and timber beams that support the ceiling move slightly over time, usually in response to changes in temperature or humidity. These slight movements are also common in older houses. Suppose a crack continues from the ceiling down into a wall. In that case, this is typically a sign of a larger problem, such as a sagging roof or foundation issues requiring a professional’s attention.

You can repair these cracks by applying drywall compound over the area to fill and conceal them. Be sure to use a thick enough layer to ensure the crack doesn’t show through your next paint job. You can also cover the crack with fiberglass mesh tape, which is a bit more durable than drywall compound and can be painted over like any other drywall seam.

Small cracks and spider web cracks usually appear due to poor workmanship and can be patched by an experienced DIYer. Larger spiderweb cracks are more likely to be a sign of foundation settling and should be investigated by a professional.

Cracks that cause water damage or discoloration are more serious and must be dealt with quickly to prevent further structural damage and mold growth. Water damage often indicates a major leak or plumbing issue that needs to be addressed before the cracks can be fixed.

The best way to treat water damaged ceilings is to locate the source of the leak and fix it. A professional can help with this by identifying the cause of the leak and making repairs accordingly. This can be a much more involved process than simply repairing the ceiling cracks, depending on the extent of the water damage and any other problems that may be occurring with the structure of your home.

Water Stains

Water stains on your ceiling are not only unsightly, but they can also indicate a hidden leak in the roof or plumbing. If left untreated, water damage can cause mold and rot that threatens the structural integrity of your home. In addition, mold can trigger respiratory problems such as rashes, dizziness, headaches, or asthma attacks in family members.

If the stains on your ceiling are minor, you can often cover them with paint that includes a stain-blocking primer, advises Bob Vila. However, before you do so, it’s important to address the source of the water intrusion in order to keep your home and belongings safe.

Leaks in your ceiling can come from several sources, such as damaged shingles, cracked caulking, or improperly installed windows. You can check for these causes by examining the surrounding area of the ceiling. Leaks can also result from faulty pipes or toilets that don’t seal properly, or they can be caused by condensation buildup in poorly insulated areas, where warm air can condense on cold surfaces.

Once you’ve found the source of your leak, it’s important to dry out the affected area. This can be accomplished by opening up the ceiling panels, using a dehumidifier, or placing the room near an exhaust fan. You may need to replace any drywall that was waterlogged or weakened by the leak.

If the stain is large and severe, it’s important to locate and fix the leak, as covering it up could lead to further damage in the future. Once the water damage has been addressed and the area has dried, you can apply a stain-blocking primer before painting. Make sure to choose a paint that is specifically formulated for use with water stains, so the stain won’t peek through. This can be found at any hardware store and may say ‘stain block’ or ‘stain sealant’ on the package. Be sure to follow the product’s instructions when applying it to your ceiling.

Holes

Holes in the ceiling can be caused by many things including leaks, lighting or fixture installation, and simple accidents. Fortunately, they’re easy to fix. The key is to remove any lingering moisture from the area as quickly as possible. This will prevent mold or mildew from growing, and it will also help prevent termite damage. The next step is to patch the holes. This can be done by simply using a mesh drywall patch or you can make a square patch out of new drywall. In either case, the patch will need 2 coats of spackling and will need to be sanded between each coat. Finally, the patch will need to be primed before you can paint over it.

To make a patch, start by measuring the size of the hole and making sure you have a piece of drywall that will fit. If you’re repairing a large hole, it may be necessary to cut a piece of wood strapping that is a little longer than the hole’s size. Screw the strapping to the ceiling joists on each side of the hole, then use it as a support for your patch.

Once the wood is in place, use a utility knife to clean up any loose edges of the drywall around the hole and then use a wet sanding sponge for drywall to smooth out the spackling. This can take a while, but it’s worth the effort to ensure your ceiling is looking great.

If you don’t have a lot of time to spend on your ceiling repairs, you can purchase self-adhesive patches that are designed to stick to the ceiling without any additional work from you. These are easy to use and provide a strong bond that will last for years to come.

Another option is to use a bit of card to cover the hole until you’re ready for a more permanent repair. This won’t look as good, but it’s a cheap and effective solution that works well for most situations. Alternatively, you can buy decorative medallions that can be placed over the hole to add some extra flair to your room’s décor.

Texture

Many homes feature textured ceilings, popular in the 1950s as an easy way to finish a ceiling and hide imperfections. They started going out of style around the same time disco did, though, as homeowners realized they were difficult to repair, dust- and spiderweb-magnets, and a pain to paint. If you have a textured ceiling, consider having it professionally tested to determine if it contains asbestos, which can be harmful if inhaled. If it does, have the texture scraped and replaced with a smooth surface, which is easier to clean and paint.

If you have a plaster ceiling with extensive damage, it may be better to replace the damaged area with drywall rather than re-texturing. This will provide a clean, modern look and will also encapsulate any asbestos-containing materials. To install drywall, locate and mark the ceiling joists. Cut drywall panels to fit the ceiling dimensions and screw them to the joists with a drywall lift. Apply a thin layer of joint compound to seal cracks and dings, then sand smooth. Prime and paint as needed to help the patched areas blend in with the rest of the ceiling.

A sloppy patch job on a ceiling can make the entire room look unkempt. It’s important to do a thorough visual inspection of your ceilings regularly to spot problems like water stains, cracks and sagging. Repairing these issues promptly will prevent more serious problems, such as mold or rot, from developing down the line.

Replacing ceiling texture can be a messy process, so be sure to use safety glasses and a mask to avoid breathing in any dust or dirt particles. It’s also a good idea to lay down drop cloths to protect the floor and anything else in the room you don’t want to get paint on.

If you’re not sure how to proceed with a particular problem, consult the experts at your local home improvement store for advice. They can help you decide whether to hire a pro or take on the project yourself. Some professionals can even offer to remove the existing texture and apply a fresh coat of paint.

Navigation