Tag: roof repair

The Basics of Roofing

A roof is an integral part of a building that shields the interior from rain, snow, wind, and sun. In addition to its protective role, it enhances a home’s appearance and can boost its value.

A strong roofing system begins with framing rafters or prefabricated trusses. Then comes sheathing, usually plywood or oriented strand board (OSB). The valley and ridge of a roof require specific shingles called hip and ridge shingles. Contact Erie Roofing Company now!

Roofing is an ancient practice that has come a long way from its humble beginnings. It is a reflection of human ingenuity and adaptability, continually evolving to meet the needs of changing environments and aesthetics. Originally, roofing was simply to provide shelter from the elements. However, it has since evolved into an integral part of a structure’s aesthetic, as well as providing insulation and structural support.

The first roofs were constructed using whatever materials were available in the surrounding environment, such as animal skins, mud, branches, and rocks. Archaeological evidence indicates that these primitive constructions were used as early as 40,000 years ago, when people began to live in caves for shelter against the elements.

In the following centuries, as societies advanced and technological advancements were made, more durable and fire-resistant building materials started to emerge. One of the biggest milestones in roofing occurred during the Renaissance, when elaborately crafted slate and terra-cotta tiles were introduced. These new roofing materials allowed architects to create more complex designs, such as curved roofs.

Throughout the 19th century, wood shingles became increasingly popular in North America, and were often treated with pine pitch and linseed oil to provide protection against rain and sunlight that cause deterioration. This treatment also gave shingles their characteristic colors of gray, brown and red. However, this type of roofing was not a safe choice for high-rise buildings because of the flammability of the wooden shingles. The introduction of clay tiles in the Mediterranean region marked another significant improvement in roofing, as these were fired in kilns and offered better water resistance and durability. This technology was eventually brought to North America, where it is still in use today.

Materials

Roofing material is the outer protective layer that shields the building from the elements. The materials vary and may include natural products such as thatch, sand or straw; commercially produced products like asphalt shingles, clay tiles and corrugated galvanized iron; and specialized metals. Most of these are placed on top of a secondary water-resistant product called underlayment.

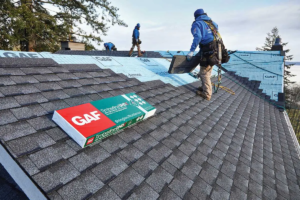
A popular residential choice, asphalt shingles are available in a wide range of colors and styles and are easy to install. They are relatively inexpensive, provide good insulation, and offer an average lifespan of 20 to 30 years.

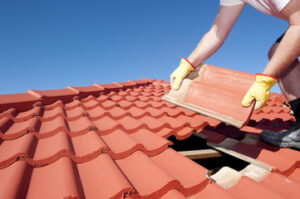
Wood shingle and shake roofs are attractive and durable but are expensive to replace if they sustain damage from wind, hail or fire. Young growth cedar is a good roofing material but will only last 30 to 50 years in relatively dry climates. Older growth cedar and redwood are much more durable but can be damaged by rot or insects. Slate is a beautiful roofing option with long life expectancy but can be expensive and heavy. Synthetic slate tiles are often used for the look of traditional slate at a lower cost and weight.

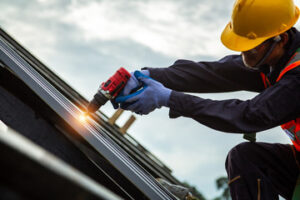
Galvanized steel roofing, usually coated with a coloured alloy of zinc and aluminum, is common in industrial applications but is also popular on residential roofs. It is light in weight and has very favorable fire ratings and impact resistance for elements such as hail.

Choosing the right roof material for your MLM home improvement project requires careful consideration of several factors. These include the durability, waterproof protection and insulation needs of your home, maintenance requirements, cost, aesthetics and the local weather conditions. A professional contractor can assist you in your decision making process and guide you in the selection of the appropriate roofing materials.
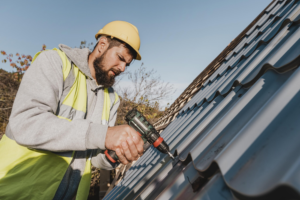
Installation

Roofing is the process of installing a protective covering on top of residential or commercial buildings to shield against rain, snow, wind, sunlight and other environmental factors. It involves a complex set of processes, including inspection, preparation, installation, and cleanup. Depending on the building, type of roof and climate conditions, various roofing materials like shingles, metal sheets, tiles, slates or wood shakes can be used. Besides providing protection, roofing also offers insulation and enhances the aesthetic appeal of the structure.

Before starting the actual work, our roofing contractors will inspect your current roof and identify any problems that need to be repaired. They will also provide a detailed estimate and help you select the best roofing materials that meet your needs and budget. They will take into account all the small details of your project to ensure that everything is covered and to your satisfaction.

The next step is removing the old roof and prepping the new one for installation. This includes laying underlayment to add additional support and prevent moisture penetration; flashing around chimneys, vents, and roof edges to prevent leaks; and shingling or other roofing material in a pattern that protects the building against weather elements while enhancing its aesthetic appearance.

During the installation process, our roofing contractors will be using specialized equipment that can create a lot of debris. To minimize the mess, they will cover any landscaping or shrubs on your property with tarps and ensure that all open drains are covered to avoid blocked drainage. They will also clean up any debris and trash left behind after the installation is complete.

Repairs

When a homeowner encounters damage to their roof, they have two choices: repair or replace. Repairs involve covering over existing shingles with new ones in order to correct the damage and restore the functionality of the roof. The cost of these repairs is lower than that of replacing the entire roof, making them the ideal choice for budget-conscious homeowners.

However, repairing a damaged roof is not without its drawbacks. First, a second layer of shingles cannot provide as good an aesthetic finish as the original roofing materials. Furthermore, since the old shingles are not removed, it’s impossible to know what type of damage exists underneath. Re-roofing may also void the warranty of the new shingles and prevent them from lasting as long as a replacement roof.

Homeowners who engage in regular repairs and inspections of their roofs are able to detect potential issues that can threaten the integrity of the structure. They can then address these problems before they have a chance to escalate into costly leaks and structural damage.

In addition, roofing repairs can make a house more energy-efficient by reducing the amount of air that escapes or infiltrates the building. As a result, this can lead to reduced utility bills and a more sustainable living environment. In the event that a roof is compromised, it can allow mold and mildew to grow inside the building. This can create health and safety risks for people with respiratory conditions or allergies. A leaking roof can also increase the chances of water or moisture damage to furniture, carpeting and other interior components.

Maintenance

Roofing is an important component of building construction that protects the interior from weather elements like rain, wind, snow, sunlight and heat. It also provides insulation and structural support for the interior of a building. Roofing can be made from different materials including asphalt shingles, metal sheets, tiles, slates, wood shakes and shingles or synthetic materials such as rubber or PVC. Roofing maintenance procedures include regular inspections, repair of minor damage, and replacement of worn shingles or other materials.

During a roof inspection, it is important to look at the overall condition of the roof deck and structure, as well as the integrity of the insulation and any visible signs of water damage. The most common causes of leaks are deteriorated or missing insulation, inadequate flashing and gutters, and the presence of moss or other vegetation. It is also important to examine the caulk around chimneys and vent pipes to make sure it is still properly sealing. The type of weather in a region will affect the condition of the roof, so an inspection should be performed each season.

Inspect the rooftop for accumulated debris, which can block drain lines and cause the roof to rot or decay prematurely. Also, regularly trim any trees near a flat roof to prevent branches from falling onto the surface during storms.

It is also a good idea to inspect all ladders, scaffolding and other equipment that is used for roof maintenance, as this can be a source of accidents and injuries for personnel working on the roof. It is recommended to implement a multi-layered approach to fall prevention and protection that includes elimination, substitution, engineering controls and administrative controls as part of a comprehensive occupational safety program.

Why You Should Only Work With a Professional Roofer

Roof Repair Columbus GA, can be a big job and requires special care because it involves a very fragile surface above the ground. You should only work with a professional roofer!

A professional can handle surface repairs like replacing a missing shingle or patching small holes. However, it’s important to look for flashing problems like rust or leaking water as soon as possible.

Shingles are your roof’s primary defense against inclement weather, so damaged ones must be replaced quickly. Naked spots on the roof offer no barrier against rain and sun, and moisture can easily penetrate and damage the underlayers of the roof. This can lead to leaks, mold growth, and structural damage over time.

A quick inspection of your roof can tell you if there are any broken or missing shingles. You can spot these from the ground when you walk around your home, but climbing up onto the roof will give you a more complete view. Look for cracked or curled shingles, which signal that they are close to the end of their useful life and need replacement. Also, keep an eye out for granule loss, which is another sign that the shingle is deteriorating.

You can replace a damaged shingle by loosening the nails that hold it in place and sliding it free. To access the nails, slide a flat pry bar underneath the shingle just above it. This will break the glue seal that holds it to the shingle below. Then, slide the shingle you’re replacing to the right spot and nail it through its own adhesive strip.

If you’re not comfortable working on the roof or have a particularly steep roof, consider hiring a professional for this repair. In addition to helping you avoid the risks of falling, they can also help ensure that your repair job is done properly.

After replacing a damaged shingle, you should check the surrounding shingles to make sure that they’re in good shape. If you notice any cracks, rips or other signs of wear, you can use asphalt roofing cement to seal the area and prevent further damage.

While you’re on the roof, check for deteriorating flashing as well. Flashing acts as a sealant to keep water from seeping into your home through joints in the roof, and it’s vital for protecting the integrity of your roof. Air conditioning ducts, chimneys and other protrusions often require their own flashing to protect them from the shingles, but you can also install flashing at any weak points in your roof.

Rusty Flashing

Flashing is an important part of your roof, providing a seal at the points where it meets other roofing materials or protrusions like chimneys. But it can also be vulnerable to damage from extreme weather. For example, metal flashing can rust or degrade if it’s exposed to moisture over extended periods. This can compromise its ability to protect other parts of the roof and your home’s interior from water penetration.

A small amount of rust or corrosion may not cause a problem, but it should be repaired as soon as possible. If the rust or corrosion continues, it can cause leaks and other damage. To prevent further deterioration, check flashing regularly for damage or rust. Make this a regular part of your annual roof inspection (preferably in late autumn).

When you spot any signs of rust or corrosion, it’s essential to take action promptly. This may involve removing the affected section and replacing it with new flashing, or cleaning and priming the existing flashing before applying a fresh coat of paint. For best results, use aluminum paint that’s formulated to adhere and mimic the appearance of galvanized flashing.

For more extensive damage, you may need to replace the flashing. This can be a challenging task that requires professional training and tools to get the job done safely. The process involves working at heights, and it’s important to wear proper safety equipment, including a harness and a ladder that is secure on the ground. You’ll also need to have access to a pair of scissors, a ladder extender, a caulking gun, roofing cement, and roofing nails.

If you notice water stains on your walls or ceilings, this is an indication that the flashing has become damaged. This could be caused by the expansion and contraction of the metal during drastic temperature changes, which can cause the flashing to become warped or cracked, allowing water to enter your home.

To fix this, you’ll need to remove the existing flashing and clean the area. If the flashing is still intact, you can apply a thin layer of roof cement over any cracks or gaps to create a seal and protect the rest of your roof. If you need to replace the flashing, choose a material that’s compatible with your current roofing system and install it with care.

Moss and Mildew

Moss grows in areas that receive little sunlight and are often cool and damp. It’s not harmful when it grows on tree bases or rocks around your home, but it can develop into a major problem when it invades the roof. As it grows, moss absorbs water and retains it like a sponge. This constant moisture can lead to shingle degradation and create a habitat for organisms that can break down the wood structures of your roof. Moss also interferes with proper drainage of rain and melting snow, which can clog gutters and cause leaks inside your home.

It’s possible to get rid of moss on a roof by scraping or brushing, although this may damage the shingles and should be done only in areas that aren’t already damaged. A more effective way to remove moss is to use a commercial product available at most hardware stores. Most of these pre-mixed cleaners come with a hose attachment and are sprayed onto the roof. When using a liquid solution, work in small sections, as it’s easy to lose track of your progress and leave parts of the roof untreated. You can also make a homemade cleaning solution by mixing equal parts of baking soda and citrus oil-based products. This mixture alters the pH of the environment and makes it unsuitable for moss, but be sure to test it on a small section of the roof before applying it to the entire surface.

If you’re not comfortable working on your roof, you can still have a professional inspect it and recommend the best course of action. In addition to repairing damaged shingles and preventing leaks, regular roof inspections can detect other problems before they become serious.

It’s important to have a well-functioning, durable roof that can protect your home from the elements and protect its value. Invest in regular repairs, and your roof should last for the lifetime of your house. For more information, contact a roofing expert near you. They can assess your roof and give you a quote for any necessary repairs.

Water Leaks

A leaking roof can cause water damage throughout your home. This can include wet carpets, warped ceilings, and damaged woodwork. It can also lead to mold growth and other health problems. Water leaks can be caused by poor building upkeep, damaged tiles and flashing, or simply wear and tear over time. Regardless of the cause, it’s important to fix it quickly and efficiently to avoid long-term structural issues and other costly repairs.

Fortunately, many of the factors that contribute to roof leaks are preventable. Here are some of the most common causes:

People: People can cause a number of roof leaks by walking on the roof without proper shoes and by using tools or equipment on the surface. These actions can cause rips and cuts that leave the roof vulnerable to water intrusion. It’s also important to protect your roof with walk pads, especially when installing rooftop equipment.

Issues with Seams: When the seams of your roof are not properly sealed, water can seep into the roofing system. This can happen from the edges of the roof or at the corners. Sealants should be applied regularly to keep the seams watertight.

Poorly Installed or Damaged Flashing

Flashing is a metal material that’s used to seal the joints in your roof and around chimneys, vents, and skylights. It’s essential to install it correctly and secure it tightly to prevent water leaks. However, flashing can become corroded or damaged from the elements and may require repair or replacement over time.

Valley Leaks

A leaky roof valley is a major problem that can be difficult to detect and expensive to repair. A valley repair requires removing the shingles and flashing from the affected area, as well as the adjoining shingle row. Special care is taken to ensure that the new shingle and flashing are integrated with each other. The process is even more complicated for roofs with stucco or brick walls, as the new flashing must be embedded into the wall and carefully aligned with the roofing materials.

A sagging bulge in your ceiling is usually a sign that there’s a roof leak. If left untreated, the sagging can lead to severe structural damage. It’s a good idea to poke an opening in the sagging bulge with a screwdriver or knife to release the build-up of water that’s causing the damage.

How to Prepare Your Home for Roofing Installation

As with any construction job, roofing work produces a lot of noise. If you or your family are sensitive to loud noise, it’s a good idea to keep them away from home while this work is taking place.

Roofing

The first thing your roofer will do is lay an ice and water barrier (if there isn’t one already) and underlayment. This protects the sheathing from moisture and adds strength. Learn more by visiting https://www.corpuschristiroofingco.com/.

The roof over your head is more than just a shield from the elements. It’s a critical design feature and an investment in the longevity of your home. As such, it’s important to weigh the benefits and drawbacks of different roofing materials before making a decision. Durability, cost, energy efficiency and aesthetics are all important factors to consider.

Asphalt shingles are the most common residential roofing material, favored for their cost-effectiveness and considerable variety of color and style options. They’re composed of a fiberglass or organic base that’s covered with mineral granules and asphalt, and they offer a moderate level of durability that can last up to 30 years.

For flat roofs, single-membrane systems are popular, including EPDM rubber roofing, PVC roofing, and chlorinated polyethylene and chlorosulfonated polyethylene sheets. These systems provide a watertight seal over any existing substrate or structure, such as wood or concrete decking.

Specialty shingles designed for the hip and ridge areas of your roof give it a finished look and provide protection from moisture build-up. Fascia boards, which get hung from the ends of rafters or trusses, are also essential components for your roof frame. They help to protect the roof from water damage and direct rainwater into gutters, which help prevent flooding or other structural problems in your home.

Other important roofing materials include underlayment, ice and water shield, and flashing, which reinforce vulnerable areas and enhance waterproofing. Underlayment helps to keep your home dry during the roof tear-off process and serves as a base layer for the other layers of your roofing system.

A roofing nail gun and high-quality nails are also required tools for securing shingle or other materials. Other specialized roofing tools include a roof ripper, which can be used to remove old roofing materials during a complete roof replacement. Before starting a project, it’s crucial to clean the roof thoroughly with a broom and blower. It’s also essential to wear work gloves and long pants during the cleaning and installation process. Lastly, be sure to stay safe by using a ladder instead of walking on the roof.

Preparation

Once you’ve selected your roofing materials, it’s time to get ready for the project. The first thing that your contractor will do is remove your old roof. This process can be noisy and messy, so it’s important to make arrangements for children and pets to stay elsewhere while the work is done. They can either be kept at a friend’s house or boarded in a pet-friendly facility. It’s also a good idea to have an activity planned for them to keep them busy and out of the way.

Next, the roofers will begin removing the underlayment and installing new materials. This step can be messy, so it’s important to cover sensitive areas of your home and yard with tarps. This will protect your landscaping and plants from shingles and other debris that may fall off the roof during the tear off process. It’s also a good idea for you to clear the area around your house and move vehicles, patio furniture, grills, potted plants, lawn ornaments, and any other items that might be damaged by falling debris or the pounding of hammers and nail guns.

The installation of your roof will likely take multiple days. You’ll want to make sure that you have a place to park your car and that it will be out of the way during this period. Your roofers will need to drive their vans, trucks, and other equipment to your house, so having a place for them to park will help the project run smoothly. It will also be easier for you to get in and out of your driveway.

The pounding of hammers and nails will cause vibrations throughout your home. This can damage wall-hung pictures and other fragile items. If you have knick-knacks or mementos on your walls, it’s a good idea to cover them or relocate them to lower parts of your home during the replacement process. The same goes for objects in the attic, which can be shook by the noise and movement. It’s also a good idea at this point to clean up and cover any drains in your yard, so they don’t become blocked by shingle debris.

Installation

Roofing is difficult work that requires a lot of time and can be very dangerous. For this reason it is recommended that homeowners who are not experienced in re-roofing should hire professional contractors to perform the work. The first step in the process is to clear the roof of any debris, and then to prepare the deck for the shingles. The contractor will cover sensitive areas of your yard and home with tarps and will bring in a dumpster to dispose of the old roofing materials. The contractor will then start laying the first row of shingles, overlapping the starter strip and nailing in place. The shingle rows will then be offset from each other by six inches, so that tabs in adjoining rows never line up.

Final Inspection

During the final inspection, the roofer will check that all of the components have been installed and are in good condition. The inspector will also walk the entire roof to validate the nailing pattern, look at areas that were noted as crucial during the pre-inspection and ensure that everything was done to minimum code.

Inspecting for safety and quality is an essential part of any construction project, but it’s especially important when a building is ready for occupancy. If the final inspection fails, a number of issues could arise that have to be corrected before the property is legally able to be used for its intended purposes. These can include anything from a minor issue like the wrong number of outlets in a room to something major such as the soil has moved, causing the foundation to crack.

When scheduling the final inspection, make sure that you allow enough time to correct any issues. Generally, a final inspection can take about three hours to complete. It’s a good idea to have a checklist that shows which items were completed and which ones need to be addressed. This can help prevent any confusion when it comes time to schedule the inspection and can ensure that the entire process runs smoothly.

A reputable roofing contractor should be intimately familiar with the local codes that pertain to the type of roof being installed. For example, NYC requires specific fire ratings for certain types of shingles and other materials. They should also be knowledgeable regarding egress requirements and other code compliance concerns.

A final building inspection is a crucial step in any construction project, and failure to pass can delay the closing of a home or commercial building significantly. It’s important to work closely with a professional during every step of the process to ensure that the building is up to code before a final inspection is scheduled.

Some inspections are required prior to the final inspection, including a pre-inspection, a post-mortgage inspection and a lowest floor elevation inspection for buildings in flood hazard zones. The general contractor is generally responsible for scheduling these inspections and making sure that the building is up to code at each stage before a final inspection is conducted. By doing this, the builder can ensure that no surprises come up at the final inspection and can help keep the project on schedule and on budget.

What Goes Into Roofing Installation?

Roofing installation is a complex task that involves laying out shingles and nailing them in place. The process can take several days for an average sized home.

Roofing

Investing in the right roof can improve your home’s appearance and boost its value when it comes time to sell. It also addresses mismatched patches and leaks that can reduce your home’s efficiency. Visit https://www.northportflroofing.com to learn more.

The quality of roofing materials is an essential factor in a home’s protection and beauty. Premium roofing materials can increase a property’s market value, while protecting it from moisture damage and pest infestations.

Roofing materials include a roof deck or sheathing, underlayment, leak barriers, shingles and other finishes, and flashing. The roof deck is the structural surface of the roof and is usually made of plywood or oriented strand board (OSB). The underlayment is a moisture barrier that prevents water penetration into the sheathing and underlying shingles. Leak barriers, such as GAF’s WeatherWatch mineral-surfaced leak barrier, are installed in vulnerable areas of the roof such as eaves, valleys, and around protrusions to protect against leaks caused by ice dams or wind-driven rain. Flashing is a metal piece that is installed in roof transitions and protrusions such as chimneys, vents, skylights, and dormers to prevent leaks. A shingle is the main component of any roof and comes in a variety of colors, shapes, and styles. Asphalt shingles are the most common type of shingle and provide excellent durability, weather resistance, and value for your money.

Other types of shingles include cedar shakes and wood shingles. Both are a great choice for a classic, rustic look and can be used to create a unique design for your home. They are not as durable as other roofing materials, however, and can be prone to moisture damage and fires.

Metal roofing is another option that offers superior durability. It can withstand high-speed winds, earthquakes, and extreme weather conditions. It is also resistant to insect infestations and can last for more than 50 years.

Energy efficient roofing materials are available to help reduce your energy consumption and save you money in the long run. These materials use reflective properties to regulate your home’s temperature, reducing the need for excessive heating or cooling.

When choosing roofing materials, be sure to consider your budget and the regional climate. The cost of premium roofing materials and professional installation can add up, but the long-term benefits will pay off in terms of energy savings and increased home value.

Installation

The installation of a new roof is a multi-step process that demands attention to detail and experience. Whether you choose to do your own roofing or hire a professional, it’s important to understand what goes into the process to ensure that it’s done correctly.

To begin, the contractor will prepare the work area and remove the existing roof. This can include covering anything in the yard or garden that might get damaged by a tear-off, having a dumpster delivered, and placing wooden boards around things like air conditioning units to protect them from debris.

Next, the underlayment is installed, starting with a starter strip that adheres to the roof surface and acts as a barrier against water penetration. The shingle row will then be laid over the starter strip and nail down, using a pattern that has nails close together along the edge and spread out further towards the middle. After this, the next shingle row will be laid over the first and fastened in place, overlapping it by six inches. This will create a watertight seal. Finally, ridge vents will be installed to allow for airflow and prevent heat buildup in the attic, while a ridge cap will complete the look.

This is a labor-intensive project and requires proper safety equipment. Workers should always wear hard hats, use ladders that can support their weight, and be careful not to walk on the top of the roof. Workers should also have a harness and rope that they can use to secure themselves to the roof in case they need to go back down, as well as a tool belt that includes a small pry bar and hammer for removing old shingles or installing new ones.

Repairs

During roofing installation, your roofers may find that parts of your roof need repair. This is normal, especially after a major storm. Your roofing contractor will work with you to decide if the damaged area can be repaired or if it would be better to replace that part of the roof altogether.

A new roof will allow you to choose from many different roofing materials. Your friendly contractor will explain the strengths and limitations of each choice so you can make a informed decision. You can select dimensional shingles for an architectural look, three-tabs for a budget option, wood shakes for a natural aesthetic, and metal roofing for energy efficiency.

If your home has a chimney, wood stove pipes, or vents, your roofer will install pipe boot flashing to protect these penetrations. They will also cover the eaves with drip edge flashing to prevent water seepage. If your roof has valleys, they will seal these with ice and water sheathing and roofing cement. Your roofer will also cap the ridge with special shingles that fit tightly over the peak.

The fascia is a long piece of wooden board that protects the lower edges of your roof from water damage, pest infestation, and mold growth. Your roofer will inspect the fascia for any damage and replace it if necessary.

Most homeowners will need to have their gutters replaced during a roof replacement. These are heavy, and your roofing contractor will use a crane to lift the gutters and place them on the roof. Your roofer will need to have a permit to do this work in most neighborhoods, and they can help you obtain this.

Re-roofing can be a good solution if the existing roof is in moderate condition and only needs minor repairs to extend its life. However, if you have significant damage or deterioration, it is usually more cost-effective to get a new roof rather than continuing to pay for costly repairs. Even if you choose to re-roof, it’s always a good idea to have any problems addressed immediately to avoid further damage and costlier repairs down the road.

Maintenance

Most roofing materials come with a warranty, which is important for peace of mind and to ensure that any problems are fixed. However, in order to keep your roof’s warranty valid and to prevent leaks from occurring, you need to perform maintenance. Some of the maintenance that can be performed on a regular basis is cleaning gutters, clearing debris, and trimming trees so they don’t hang over the roof. In addition, you can also apply protective coatings and treatments to prolong the life of your roof.

A maintenance program typically starts with a thorough inspection. A trained roofing professional will look for signs of wear, leaks and water penetration. A good inspection will include examining the field of the roof as well as flashing and details such as equipment curbs, chimneys, walls, skylights, and vents. Inspecting the flashing is also essential because most leaks occur in this area.

The roofers will remove the old shingles and any existing underlayment. They will then prepare the surface for new shingles by removing any soft, wet or rotted wood and applying a waterproofing underlayment. A corrosion-protected drip edge will then be installed, followed by the starter shingle strip and then a layer of high-quality roofing shingles. In addition, a waterproof WeatherMaster shield will be installed on all valleys, transitions, walls, vents and penetrations to defend against leaks.

If needed, a ridge cap will be added to the peak of the roof. This step is vital because it creates a seal and stops moisture from entering the home through the roof.

Finally, a top-quality caulk is applied to all raw edges to make sure that the new roof is waterproof and airtight. This is important because if the edges of the new roof are not sealed properly, rainwater may enter through the joints. In addition, the caulk acts as a barrier against wind-driven rain, snow and ice that can cause damage to the roofing system over time. A final inspection will be done by the roofing crew to make sure that the work is up to code and looks great.

Navigation